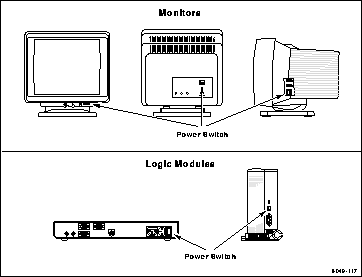
Figure 2-1 Power Switch Locations for Different Components.
If the network computer does not power on, refer to Chapter 5, Solving Power Problems for troubleshooting information.
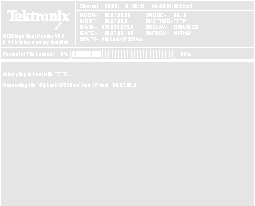
Figure 2-2 Network Computer Boot Screen.
During a normal boot, the network computer successfully locates and begins to read the boot files and the Percent of File Loaded slide bar appears on the boot screen. During a boot, pressing any key on the keyboard halts the boot process. Do not halt the boot unless directed by your system administrator.
After your network computer completes the boot process, one of the following should appear on your monitor:
 The login method is determined by the Host Connect Method command. This command is set by the system administrator in the remote configuration file or through Setup on the network computer.
 Logging in from the Root Weave
The root weave is a gray, patterned screen available on all network computers. When the network computer is ready for input, an X-shaped cursor appears on the screen. A network computer with the root weave and cursor is illustrated in Figure 2-3.

Figure 2-3 Root Weave with X Cursor.
To log in from the root weave, you need to manually start the Client Launcher. Press Setup to bring up Client Launcher. Refer to Logging in with Client Launcher on page 2-5.
Logging in with Client Launcher
Client Launcher starts the local client you select from a menu. An arrow to the right of an entry indicates a submenu. In Figure 2-4, selecting Host Connections displays a sub-menu listing available host connections, such as Telnet or Cterm.
Your system administrator configures the Client Launcher to include the local clients you use most often. The Client Launcher on your network computer may list different clients and submenus than those that appear in Figure 2-4.
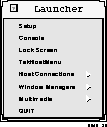
Figure 2-4 Client Launcher menu.
Use one of these methods to start a client from the Client Launcher:
 The Client Launcher appears automatically if it is specified in the remote configuration file. The applicable command is start (set to LAUNCHER).
Notice the list buttons across the top (for example, XDMCP and VMS TDEnet). These buttons determine which type of log in list is displayed. The button pressed in indicates which list is currently displayed.
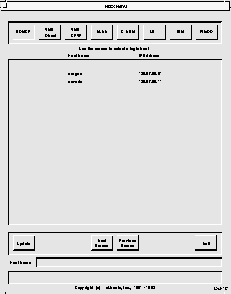
Figure 2-5 Example HostMenu.
To log in with HostMenu using either the mouse or the keyboard:
 HostMenu appears automatically if it is set up as the connection method through the remote configuration file or through Setup. The applicable commands are: Host Connect Method (set to TekHostMenu) and Default Host List which determines the list that is initially displayed.
 Logging in at a Login Prompt
If your system administrator has set up your network computer to directly log in to a specific host, some type of welcome screen with a login prompt is displayed. A welcome screen is also displayed for programs like HostMenu after a connection is made. Sample login screens for the UNIX host oregon and the VMS host IDAHO are illustrated in Figure 2-6 and Figure 2-7.

Figure 2-6 Example UNIX Login Screen.
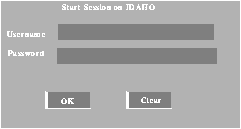
Figure 2-7 Example VMS Login Screen.
To log in:
 Direct connections are specified by your system administrator through the remote configuration file or through Setup. The applicable commands for UNIX systems are: Host Connect Method (XDMCP Direct), and XDMCP Server (set to your host). The applicable commands for VMS systems are: Host Connect Method (set to VMS), VMS Autologin Transport (set to TDEnet), and VMS Autologin Tdenet Host (set to your host).
 Logging in with Telnet
There are two ways to log in through Telnet, depending on whether your system administrator specified a default Telnet host for your network computer. If your network computer displays a Telnet> prompt like Figure 2-8, a default host has not been specified. In this case, you must open a connection before you can log in to the host.

Figure 2-8 Telnet Window Waiting for an Open Command.
To open a connection to your host computer:
where hostname is the name or network address of the host.

 Telnet connection and default Telnet host are specified by the system administrator through the remote configuration file or through Setup. The applicable commands are: Host Connect Method (set to Telnet), and Default Telnet Host (set to your host name or address).
 Closing a Telnet Window
Press Ctrl-D at the login: prompt to return to the Telnet> prompt without logging in to the computer. Logging in with Cterm
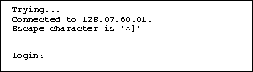
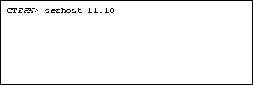
There are two ways to log in through Cterm, depending on whether your system administrator specified a default Cterm host for your network computer. If your network computer displays an NSH> or CTERM> prompt like Figure 2-11, a default host has not been specified. In this case, you must specify a connection before you can log in to the host.

Figure 2-11 Cterm Window Waiting for an Set Host Command.
To open a connection to your computer:
where hostname is the node address of the host.

 Cterm connection and default Cterm host are specified by your system administrator through the remote configuration file or through Setup. The applicable commands are: Host Connect Method (set to Cterm), and Default Cterm Host (set to your host address).
 Closing a Cterm Window
If you are at the Username: prompt and do not want to log in to the host, wait until the network connection times out and closes. A message appears on the screen when the connection closes. Typically it takes 60 seconds to time out. Logging in with WinDD
Two different WinDD screens can appear, depending on whether your system administrator specified an automatic connection to a default server. If your network computer displays the client screen illustrated in Figure 2-14, you must connect to a server before you can log in. The log in screen is illustrated in Figure 2-16.
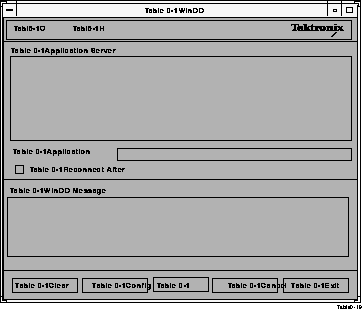
Figure 2-14 WinDD Client Screen.
NOTE: Additional WinDD information can be found in the section titled WinDD on page 4-59 in Chapter 4, Using Advanced Features.
Selecting an Application Server
The WinDD client screen (Figure 2-14) displays a list of application servers your system administration defined for you. Use the mouse to select one of the servers from the list. If the application server you want to access is not on the list, enter the name or address in the Application Server: field and press Enter.
 WinDD connection, default WinDD host, and Server entries are specified by your system administrator through the remote configuration file or through Setup. The applicable commands are: Host Connect Method (set to WinDD), Default WinDD Host (set to your default server address), WinDD Menu Entry (lists WinDD servers for HostMenu), and WinDD Host Entry (lists additional WinDD servers for the WinDD client screen).
 Setting the WinDD Window Size
From the WinDD client screen, you can easily change your session attributes before you connect to a server. Configure pulldown menu choice.
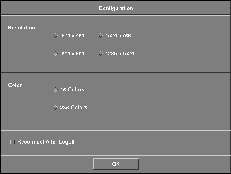
Figure 2-15 WinDD Resolution Dialog Box.
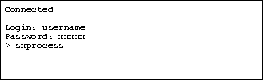
Logging in
Once you have made a connection, you are prompted to press Ctrl-Alt-Del to bring up the log in screen. The log in screen is illustrated in Figure 2-16. If you want to specify a different server or return to the Client screen for any reason, select Options Log On. The Options Log On function switches between the Client screen and the Log in screen after a server connection is made.
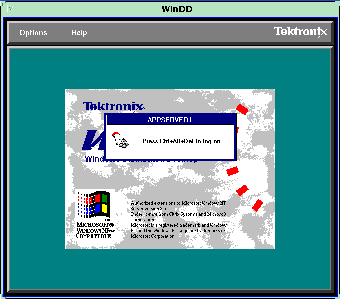
Figure 2-16 WinDD Log In Screen.
Logoff from the Program Manager.If auto reconnect is on, the WinDD log in screen is displayed. If auto reconnect is off, the WinDD client screen appears. Select one of the following methods to close the WinDD session:
Exit
NOTE: Additional WinDD information can be found in the section titled WinDD on page 4-59 in Chapter 4, Using Advanced Features.
If you have problems establishing communications, contact your system administrator.

To verify or change your serial parameters:
 Select Setup from the Client Launcher. If you need a refresher on the terminology used in these procedures, refer back to Chapter 1, Terminology.
 Serial Port connection is specified by the system administrator through the remote configuration file or through Setup. The applicable command is: Host Connect Method (set to Serial Port 0 or 1).
 Serial Communications with Serial Xpress (SXp)
A separate manual is available for Serial Xpress. Refer to the Related Documentation section in the Preface for more information.
From the Serial Port window pictured in Figure 2-17:
Continue with Chapter 3, Using the Network Computer.
 Serial Port connection can be specified by the system administrator through the remote configuration file or through Setup. The applicable command is: Host Connect Method (set to Serial Port 0 or 1).
 Logging in with LAT
If your network computer displays a LAT> prompt like Figure 2-19, you are set up to log in through a Local Area Transport supported in a DECnet environment. To login, you must connect to a LAT service.

Figure 2-19 LAT Window Waiting for an Connect Command.
To connect to a service:
to see a list of available services
where service is the name of a valid service.

Once a connection is made (Figure 2-21) you can log in:

 LAT connection can be specified by the system administrator through the remote configuration file or through Setup. The applicable command is: Host Connect Method (set to LAT).
 Closing a LAT Window
If you are at the Username: prompt and do not want to log in to the host, wait until the network connection times out and closes. A message appears on the screen when the connection closes. Typically it takes 60 seconds to time out.
 Your network computer is attempting to boot from the network or from an optional Flash memory or ROM board (read only memory). You can tell how your network computer is trying to boot by looking at the Boot Method (BMETHOD=) status line on the boot screen. Possible values are ROM, TFTP, NFS, or MOP.