[Prev Chapter] [Next Chapter] [Index]
Chapter 3
Using the Network Computer
What Next? might be a more appropriate title for this chapter. There really is no single answer to the What next? question. Your network computer is designed to be as flexible as possible so it can be tailored to fit your needs and your computing environment. This tailoring process is performed by your system administrator, with help from the installation and reference manuals that are included with the network computer software.
This chapter cannot tell you step-by-step how to get started, but it does provide general information to help you figure out What next?. Typically, one of the following scenarios occurs:
The sections in this chapter contain information on identifying what is happening on your network computer, and what choices you can make. The following topics are discussed:
X Window Software Components
Before diving into the details of the possible scenarios, it is a good idea to understand some of the common software components and terminology.
The X Window System is a windowing system developed to enhance the usability of a host computer by utilizing an X server as a device independent interface between the host computer and your network computer. This means that you can run clients on computers made by different manufacturers, freeing you to focus on your applications without worrying about computer differences. Another advantage is that X is multi-tasking, so multiple applications can run simultaneously in different windows.
The X server is the interface that translates client requests from your network computer to the host computer. It also accepts input data from your mouse and keyboard and generates the appropriate actions.
Windows are bounded areas displayed on your network computer screen that organize the presenting of information on the screen. They can contain text (letters, numbers) or graphics (pictures, graphs, animated sequences) generated by your application programs, such as word processors, or transaction processing software. The X server controls what gets displayed inside each window. Information does not spill over from one window to the next.
A Window Manager is a special program that runs on top of the X server and provides an easy to use interface for you to run and work with your clients. These items include (among others):
Those are the visible results of using a window manager. The invisible portions may be even more important to you. These items include:
Session Windows are various types of communication protocols to establish communications between your network computer and one or more host computers.
Clients are applications designed to run on an X server in a session window. Client refers to the fact that the application is typically subordinate to the window. This means if the window is closed, the client also closes.
Getting Unstuck
Occasionally something may go wrong and your network computer or a client may get stuck or hang. Hang means the network computer or the client is not responding to any input coming from you or being transmitted from the host. Often times, this is due to a busy network. There are three recommended ways to try and restore communications: resetting the X Server, rebooting the network computer, or, if the keyboard is also locked up, turn off the power on the network computer.
Resetting the X Server
This is the first method to try.
 Select Setup from the Client Launcher.
- Click on the Reset Server button.
- When prompted that this closes existing connections, click on the OK button.
The screen is blanked when the reset occurs. It may take a minute or two for the server to reset. Be patient and wait. When the root weave or your login method appears, log back in as usual. Refer to Chapter 2: Operating the Network Computer if you need information on logging in to the computer.
Rebooting the Network Computer
Sometimes rebooting is necessary, even though it adds to the network load. Try Resetting the X server before you reboot.
If Setup does not come up, or if resetting the server did not work, try rebooting the network computer. Press the key sequence: Ctrl-Alt-Delete to try and reboot the network computer. If the reboot is successful, the boot screen is displayed while your network computer boots. Refer to Chapter 2, The Network Computer Boot Process for more information on booting.
Powering off the Logic Module
NOTE: Turning off the power is the last-resort method. Try the other methods first, or call your system administrator for assistance.
If neither resetting the server nor rebooting the network computer works, turn the power off then on with the power switch on your network computer logic module.
Window Managers
There are many different window managers available, but the concepts are similar. Here is a list of the more popular window managers:
Your system administrator sets up and configures your window manager.
Determining if a Window Manager is Running
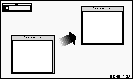
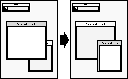
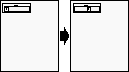
You can tell if a window manager is running by looking at the borders on an open window. If you do not have an open window, select Setup from the Client Launcher to display the Setup window. If a window manager is running, there is a border around the window, along with a title bar and usually some command buttons. Figure 3-1 illustrates a Telnet window with and without a window manager running.


Figure 3-1 Determining if a Window Manager is Running.
Starting a Window Manager
If your system administrator configured your environment to automatically start a window manager, skip to the next section, Using a Window Manager.
Your system administrator must configure the window manager on your host computer before it can be used. If your network computer has either the local MWM or OLWM options, you can start it from Client Launcher. If the option does not appear, your network computer does not have it. Contact your system administrator.
To start local MWM, OLWM, or XP window manager from the default Client Launcher:
 Open the Window Managers submenu.
- Select MWM or OLWM or XPWM.
NOTE: If MWM, OLWM, or XPWM is not available, or if you use another window manager, call your system administrator. The command to start a window manager is specific to your host and configuration.
Using a Window Manager
The examples in this section are based on Motif, a host independent window manager included with your network computer software. Host independent means that it runs on hosts from different operating systems, rather than a proprietary manager such as HPvue that is intended for only Hewlett-Packard systems. Your windows may look and operate differently from those described here. It may be because your system administrator customized your MWM settings, or you may be using a different window manager. Refer to your window manager documentation for more information.
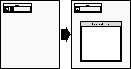
Figure 3-2 shows a typical window and its standard elements. A window usually has command buttons for menu access, and to minimize and maximize the window. Try the various buttons displayed with your windows.
In addition to the window menu and buttons, there are typically pop-up menus that can be accessed outside of a window. These menus are controlled by various system files. To see if you have these pop-up menus:
- Position the pointer outside of all windows
- Try pressing either the Select or Custom mouse buttons to see if a menu appears. Information on the menu choices would be included in your window manager or host documentation.
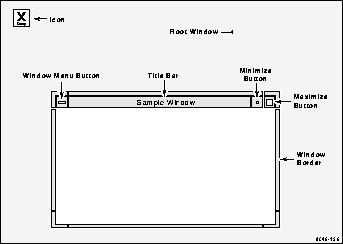
Figure 3-2 Elements of a Window.
These window manipulations are described in this sections:
Moving a Window
Windows can be moved from one location to another on the display.
- Position the pointer within the title bar or border of the window.
- Drag the pointer. When you begin moving the window, the pointer changes to a cross-arrow pointer and a window outline appears. As you move the pointer, the outline tracks the movement. A small rectangle appears in the center of the screen and displays the x and y coordinates of the window as the window moves.
- Once the window is in the desired location, release the mouse button. The window appears in the new location and becomes the active window.
Alternate method: Drag on the Window Menu, release on Move, position the window outline (by moving the mouse), and click a mouse button.
Resizing a Window
Many windows can be resized. The corners of the window border let you resize the window in two directions, while the horizontal borders and vertical borders let you resize the window in a single direction.
- Position the pointer on the window border or resize corner controlling the window side(s) you want to resize. The pointer changes to either an arrow with a corner (for resizing two sides) or to an arrow with a perpendicular bar (for resizing in one direction).
- Drag the corner or window border in the direction desired. As you resize the window, an image of the moving border(s) tracks the pointer movement.
- Release the mouse button. The window appears in the new size.
Alternate method: Drag on the Window Menu, release on Size, position the window outline (by moving the mouse), and click a mouse button.
Raising a Window
A window may need to be raised to be in front of any overlapping windows so you can see the entire window.
- Position the pointer anywhere in the window to raise (except on any of the command buttons).
- Click the Select mouse button. Raising a window automatically makes that window active. Windows cannot be raised from the Window Menu.
NOTE: There is an X feature called autoraise. If this feature is configured for your window manager, windows are automatically raised as soon as you position your mouse pointer in the window.
Lowering a Window
You can place a window behind overlapping windows.
- Drag on the Window Menu in the window to lower.
- Release on Lower.
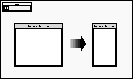
Maximizing a Window
A window can be maximized to take up the entire size of the display. Some clients do not support maximized windows.
- Click on the Maximize button in the window you want to maximize.
- To return the window to its original size, click the Maximize button again.
Alternate method: Drag on the Window Menu and release on Maximize.
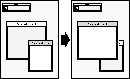
Iconifying a Window
A window can be iconified. This helps keep your windows organized and easy to access.
Click on the Minimize button in the window you want to iconify.
MWM has a client called Icons. If this client is available, it provides a box to hold and sort all of your icons.
Alternate method: Drag the Window Menu and release on Minimize.
Restoring an Icon
You can restore an icon back into a window if you want to see the window contents, or is you want to work in the window.
Double-click the Select button on the icon you want to restore.
Alternate method: Click the icon once to display a pull-down menu, and then click on Restore.
Moving an Icon
You can move an icon from one location on the display to another.
- Drag the pointer on the icon you want to move. When you begin moving the icon, the pointer changes to a cross-arrow and an icon outline appears.
As you move the pointer, the outline tracks the movement.
- Once the icon is in the desired location, release the mouse button. The icon appears in the new location.
Alternate method: Click the icon once to display a pull-down menu, click on Move, position the icon outline (by moving the mouse), and click a mouse button.
Starting Sessions
As you learned when you read Logging in to the Network Computer in Chapter 2, there are many different ways to establish communications with one or more host computers. With a network computer you can have multiple sessions open and running simultaneously. For example, you might open a word processor, cut some text out of file, and paste it into window where you are composing some electronic mail. Or, you might open a session into another host to check if a customer order has been shipped. All without having to exit your application.
Before you start a session, you typically need to know the name, or address of the remote host. You can find this out by calling your system administrator.
 There are different types of addresses based on the network protocol used at your site. Internet protocol (IP) addresses (128.06.70.01 for example) are used for networks running a protocol called TCP/IP. This is the most common network for hosts running a UNIX operating system. Node numbers (11.10:: for example) are used for networks running a protocol called DECnet. This is the most common network for hosts running a VMS operating system.
There are two easy ways to start a new session from Client Launcher. If you need a refresher on the terminology used in these procedures, refer back to Chapter 1, Terminology. Use one of these methods:
- Select TekHostMenu. When the HostMenu client appears, use the mouse to select your host. Refer to Logging in with HostMenu on page 2-6 for details.
NOTE: If you logged in with XDMCP, the XDMCP list is not available on HostMenu. Only one XDMCP session can be running.
- Select a session from the Host Connections submenu:
Telnet (refer to Logging in with Telnet on page 2-11)
Console (refer to The Console Window on page 5-4)
Cterm (refer to Logging in with Cterm on page 2-13)
WinDD (refer to Logging in with WinDD on page 2-15)
Serial Port 0 or 1 (refer to Logging in with Serial Port 0 or 1 on page 2-19)
LAT (refer to Logging in with LAT on page 2-22)
NOTE: Grayed text indicates an option that is not enabled for your particular network computer. If an option is not listed, it is not available for your network computer model.
Running Clients
Clients refer to applications that run on your network computer, such as a desktop publishing system, a computer-aided design program, or an on-line transaction processing system. Your network computer can run multiple clients simultaneously.
Your system administrator can set up your login files to automatically start one or more clients each time you login. The other alternative is for you to start the clients you need.
Typically you start clients either of two ways:
Refer to the documentation that came with your application for application-specific operation and information.
Locking the Display
You can lock your display and all open windows so that while away from your desk, an unauthorized user cannot access the information on your display. The xlock local client locks the keyboard only, or the keyboard and the display.
- xlock can be started from the Client Launcher (select Lock Screen) or with xpsh from the command prompt:
xpsh -display nc_address:0 xlock -mode n
To determine the network computer address, select Setup from the Client Launcher. Drag on Configuration Summaries and release on TCP/IP (for a UNIX host) or TDEnet (for a VMS host). The address displays as the network computer IP Address or the TDEnet Address.
The -mode n setting is optional. If set to -mode 1, xlock locks the keyboard only. If set to -mode 0, xlock locks the keyboard and the screen. If a -mode setting is not given, xlock locks the keyboard and the screen by default. If you receive a Command not found message, have your system administrator add xpsh to your path environment variable and try the xpsh command again.
When xlock is started, the xlock window appears (Figure 3-3).

Figure 3-3 Xlock Window.
- At the Password prompt, enter a password and press Enter.
- At the Retype prompt, enter the password again and press Enter. This verifies you have entered the password correctly. Xlock remains in effect until you re-enter the password. The password is valid until you reboot the network computer or reset the server.
- To unlock the display or keyboard, press any key for the xlock window. At the Password prompt, enter the password.
NOTE: If you forget your password, you must reboot the network computer or reset the server to unlock the display or keyboard.
[Prev Chapter] [Next Chapter] [Index]