[Prev Chapter] [Next Chapter] [Index]
Chapter 4
Using Advanced Features
This chapter provides information about the advanced NCBridge software features:
Audio Player
The Audio Player plays and records digital audio files. When started, the Audio Player displays as shown in Figure 4-1.
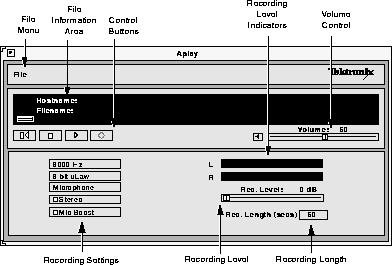
Figure 4-1 Audio Player.
The player can play files with the following extensions:
If a file does not have an extension, the player attempts to read its header information. If there is no header information, the player plays it as a headerless file (.raw).
The Audio Player supports the file formats 8-bit linear, 8-bit uLaw, 8-bit aLaw, and 16-bit linear (LSB & MSB).
The following information about using the Audio Player is available:
Starting the Audio Player
The Audio Player can be started from the Client Launcher, from the remote configuration file, or with xpsh.
CAUTION Before connecting any audio device to the network computer (such as microphones or headsets), close all clients, remote connections, and power down the network computer. Connecting devices to the network computer's audio connectors with power applied could result in a loss of data. After the devices are connected, start the Audio Player.
Starting the Audio Player from the Client Launcher
From the Multimedia submenu, select Audio Player. The Audio Player displays as shown in Figure 4-1.
Starting the Audio Player from the Remote Configuration File
The start AUDIO_PLAYER command in the remote configuration file (xp.cnf) automatically downloads and starts the Audio Player when the network computer boots. Refer to the start command in Chapter 2 of the TekXPress Reference manual for details.
Starting the Audio Player with xpsh
xpsh can start the Audio Player client as shown in Figure 4-1, or can simply play an audio file without opening the Audio Player. To start the Audio Player with xpsh, enter the following:
xpsh -display nc_name:0 aplay
The following options can be set on the xpsh command line:
-h host - specifies the host name or address on which the audio file resides. The host must be entered in the network computer's Internet Host Table in Setup. This host displays in the Audio Player's File Information area.
-f filename and path - specifies the audio file name and its entire path. This file displays in the Audio Player's File Information area.
-a access method - specifies the access method used to access the audio file. Available access methods are tftp, nfs, and dap.
-v volume level - specifies the volume level to use when playing the audio file. Specify a number between 0 and 100, with 0 indicating no volume, and 100 indicating the loudest volume setting.
-p - when used with the -h, -f, -a, and -v options, the specified file plays without opening the Audio Player. The entire file plays and cannot be interrupted.
Examples
This example starts the Audio Player on the network computer named sierra:
xpsh -display sierra:0 aplay
This example starts the Audio Player with the host portland and the audio file
/usr/adam/story.au preloaded in the Audio Player's File Information Area:
xpsh -display sierra:0 aplay -h portland -f /usr/adam/story.au
This example plays the audio file /usr/adam/story.au (located on the host portland) on the network computer without opening the Audio Player:
xpsh -display sierra:0 aplay -h portland -f /usr/adam/story.au -a tftp -p
Opening or Creating an Audio File
The Open command on the File menu creates a new file to record, or opens an existing file.
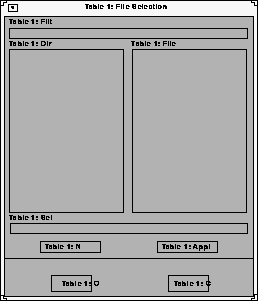
- Select the Open command from the File menu. The File Selection window appears. See Figure 4-2.
- To select the access method to use, position the mouse pointer on the NFS button and click. A drop down menu displays the available methods: TFTP, NFS, or DAP. The File Selection window changes to reflect the chosen access method.

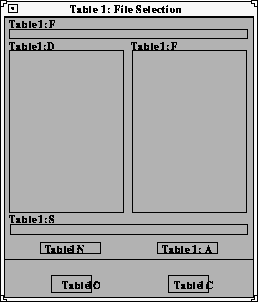
Figure 4-2 File Selection.
Using TFTP Access
The following File Selection window displays when tftp is the access method.

Figure 4-3 TFTP File Selection Window.
NOTE: Use tftp as the access method only if NFS is not available. NFS provides better and more accurate data transfer rates required to maintain continuous audio stream.
If using tftp as the access method, the Audio Player cannot play a file that is greater than 16MB. If you attempt to play a file larger than 16MB, the player will ignore the file.
Creating a New Audio File Using TFTP Access
When creating a new audio file using tftp as the file access, the file must exist and have world write permissions before the audio data can be written to it. In addition, only the .au, .wav, and .raw file extensions can be used with tftp.
- Create the new audio file and give it world read and write permissions.
- Enter the Host name or address on which the file will be stored in the Host field.
- Enter the filename, path, and extension in the Path field. Use only the .au (Sun file type) or .raw (no header) file extensions.
- Click on OK to open the file. The host and file names display in the File Information Area.
Opening an Existing Audio File Using TFTP Access
- Enter the name or address of the host on which the file is located in the Host field.
- Enter the file's path, filename, and extension in the Path field. Files with the following extensions can be played on the Audio Player:
- Click OK. The host and file names display in the File Information Area.
When opening an existing file, you can choose the Info command to see the file's original recording information. Refer to the Info command later in this chapter for more information.
Using NFS Access
The following File Selection window displays when NFS is the access method.

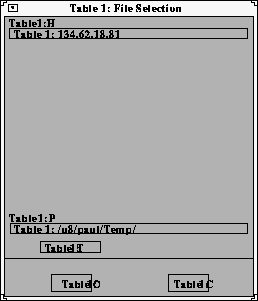
Figure 4-4 NFS File Selection Window.
Creating a New Audio File Using NFS Access
When using NFS as the file access, an NFS mount must be established to the host on which the file resides and must have world read and write access.
- Enter the local NFS mount point to the network computer in the Filter field.
- Enter the full path, filename, and extension in the Selection field. The following file extensions are available:
- Click OK. The host and file names display in the File Information Area.
Opening an Existing Audio File Using NFS Access
- Enter the NFS mount point in the Filter field.
- Click on the Apply Filter button. All subdirectories and files are listed in the Directories and Files areas.
- To view files in a different directory, click on the directory name in the Directories area, and then click on the Apply Filter button. The files in that directory are listed in the Files area.
- Select the file you want in the Files area. The full path and filename prefills in the Selection field. Enter one of the following file extensions:
- Click OK. The host and file names display in the File Information Area.
When opening an existing file, you can choose the Info command to see the file's original recording information. Refer to the Info command later in this chapter for more information.
Using DAP Access
The following File Selection window displays when DAP is the access method.
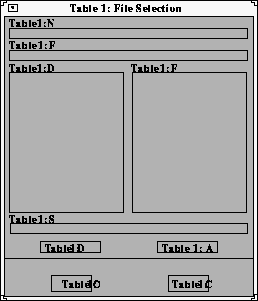
Figure 4-5 DAP File Selection Window.
Creating a New Audio File Using DAP Access
- Enter the node name or address in the Node field. This is the node on which the file will be stored.
- Enter the full path, filename, and extension in the Selection field. The following file extensions are available:
- Click OK. The host and file names display in the File Information Area.
Opening an Existing Audio File Using DAP Access
- Enter the node name or address in the Node field. This is the node on which the file is located.
- Enter the file's path and directory in the Filter field.
- Click on the Apply Filter button. All subdirectories and files are listed in the Directories and Files areas.
- To view files in a different directory, click on the directory name in the Directories area, and then click on the Apply Filter button. The files in that directory are listed in the Files area.
- Select the file you want in the Files area. The full path and filename prefills in the Selection field. Enter one of the following file extensions:
- Click OK. The host and file names display in the File Information Area.
When opening an existing file, you can choose the Info command to see the file's original recording information. Refer to the Info command later in this chapter for more information.
Connecting External Audio Devices
Figure 4-6 shows the audio input and output connectors on the rear of the logic module. All of the jacks accept a 3.5 mm stereo phone plug.
CAUTION Before connecting any audio device to the network computer, close all clients, remote connections, and power down the network computer. Connecting devices to the network computer's audio connectors with power applied could result in a loss of data.
- If you are using a microphone for audio input, plug it into the Mic input jack.
- A line level signal from a stereo audio source such as an audio mixer, pre-amplifier, compact disc player, or tape player, plugs into the line-in jack, which is marked with the
 symbol.
- The line-out jack is marked with the
 symbol and provides a line-level stereo signal for use by a mixer, pre-amplifier, tape player, or other equipment that can accept a line level input. This output provides the highest quality audio.
- The headphone jack is for use with stereo headphones, 8
 stereo speakers (unpowered), and powered speaker sets that connect to personal listening players (e.g. Discman®). Plugging in to this jack disables the internal monitor speaker.
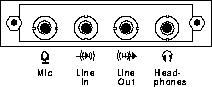
Figure 4-6 Input and Output Jacks
Audio Accessory Specifications
The following specifications can assist you when choosing accessories to use with the Audio board.
Microphone Specifications
- Microphone Type Dynamic
Electret (or condenser) with integrated battery
- Impedance Medium to High (600 to 1000 at 1 kHz)
- Sensitivity -55 to -70 db (at 1 kHz)
- Frequency Range 50 Hz to 16 kHz
- Cord Length 6 feet or longer
- Plug 3.5 mm monaural phone plug
Line Input Specifications
- Signal Level 0.775 Vrms nominal
- Input Impedance High (greater than 20 K)
- Plug 3.5 mm stereo phone plug
Line Output Specifications
- Signal Level 0.775 Vrms into a 600 load
- Plug 3.5 mm stereo phone plug
Speaker/Headphone Specifications
- Impedance 8 (min)
- Plug 3.5 mm stereo phone plug
Recording an Audio File
The Audio Player works much like a home stereo. It has a record button, a stop button, and a play button. It also has a number of recording settings you can adjust so that the audio file is recorded for the type of device on which it will be played. Audio files can be played on almost any computer that has audio capabilities, including network computers, Personal Computers, and workstations.
When a new file is created, the default file settings reflect the device on which it will be recorded, in this case, the network computer.
If an existing file is opened, the settings displayed in the Audio Player reflect the settings at which the file was recorded if the network computer can support the settings. If not, the Audio Player adjusts the settings to best match the network computer's capabilities. To see the exact settings at which the audio file was recorded, select the Info command from the File menu.
Before recording, attach any external audio devices. Refer to the previous section, Connecting External Audio Devices.
Before recording, set the following recording options:
- Frequency Select a sampling frequency. The higher the frequency, the clearer the recording. The available frequency settings are limited to the network computer hardware. You cannot record at a frequency higher than the network computer supports. If you try to record at an unsupported frequency, a warning displays.
- File Format Select a file format. The File Format determines how the audio file is stored.
- Input Source Select the input source of the audio data: microphone, stereo line, video line, or a mix of multiple sources. Refer to the Audio Mixer for information about mixing input sources. Refer to the Audio Mixer section later in this chapter for details about the Audio Mixer.
- Stereo This option toggles the stereo option. Select this option to record in Stereo, or un-select it to record in mono.
- Mic Boost This option toggles the Microphone boost option. Select this option to increase the sensitivity of the microphone.
- Recording Levels Sets and shows the recording level. Slide the recording level indicator to the right to increase the levels. The Left and Right feedback area shows the decibel levels during recording. If the levels reach the "red area", indicated by red bars, the recording may be at too high a level. Slide the recording indicator to the left to reduce the recording level.
- Recording Length Sets a maximum recording time limit (up to 999999 seconds). Use this option if you want to control the length of the recording. When the recording reaches the time limit, the player automatically stops recording.
After setting the recording options, you are ready to record:
- Use the Open command to open an existing file, or to create a new file.
-
 Click on the Record button. The recorder starts and continues to record until you click on the Stop button.
 To stop recording, click on the Stop button.
 To rewind to the audio file, click on the Rewind button. The file rewinds to the beginning.
 To play the audio file, click on the Play button.
 To adjust the volume, slide the volume controller to the right to increase the volume, or to the left to decrease the volume. Be sure the Sound button is on, or pushed in. The Sound button acts as a mute toggle; when it is pushed in, you can hear the sound, when it is off, the sound is muted.
To make recording adjustments, change any of the recording options and go back to Step 2. Repeat this procedure as needed.
NOTE: If using TFTP as the file access method, some versions of TFTP overwrite the file's contents after the file is recorded when the file's header information is added. If this occurs, use NFS as the file access method.
Playing an Audio File
Files with the following extensions can be played with the Audio Player:
If a file does not have an extension, it is played as a .raw file.
To play an audio file:
- Use the Open command on the File menu to open the audio file. When the file is opened, use the Info command on the File menu to view the recording settings. These settings may differ from the settings displayed on the Audio Player. The Audio Player settings reflect the current hardware capabilities. The original recording settings may not be available on the hardware, so the Audio Player automatically adjusts the settings to best match those that are available with the hardware.
 Click on the Play button.
 To adjust the volume, slide the volume controller to the right to increase the volume, or to the left to decrease the volume. Be sure the Sound button is on, or pushed in. The Sound button acts as a mute toggle; when it is pushed in, you can hear the sound, when it is off, the sound is muted.
 To stop playing the file, click on the Stop button. To restart the file from where it stopped, click on the Play button.
 To rewind the audio file to the beginning, click on the Rewind button.
Audio File Information
After opening a file that already exists, use the Info command on the File menu to display a window with the file's original recording information. The filename, frequency, format, channel, and duration information displays as shown in Figure 4-7.

Figure 4-7 File Information Window.
When opening an existing file, the options displayed on the Audio Player reflect the current hardware capabilities. The original recording settings may not be available on the hardware, so the Audio Player automatically adjusts the settings to best match those that are available with the hardware.
To close the File Information window, click the CANCEL button.
Closing the Audio Player
To close the Audio Player, select the Quit command from the File menu. Any open file information is saved and the player exits.
The Audio Mixer
The Audio Mixer allows you to control the hardware volume for line in, microphone, and pre-recorded (digital) sources. You are not required to use the Audio Mixer when recording or playing audio or video files. When started, the Audio Mixer displays as shown below:

Figure 4-8 Audio Mixer.
The Audio Mixer is like a master volume control, much like the volume control on a home stereo receiver. The volume control on the stereo receiver controls the output volume for all the stereo components, such as the tape player and the CD player. Likewise, the mixer controls the input and output gain for the Line In, Digital, and Microphone sources.
Each volume control has a toggle Sound button. When clicked on, the sound is heard. When off, the sound is muted until it is selected again. This allows you to quickly mute the sound and then to resume.
Starting the Audio Mixer
The Audio Mixer can be started from the Client Launcher, from the remote configuration file, or with xpsh.
Starting the Audio Mixer from the Client Launcher
From the Multimedia submenu, select Audio Mixer. The Audio Mixer displays as shown in Figure 4-8.
Starting the Audio Mixer from the Remote Configuration File
The start AUDIO_MIXER command in the remote configuration file (xp.cnf) can be used to automatically download and start the Audio Mixer when the network computer boots. Refer to the start command in Chapter 2 of the Tektronix NC200/NC400 Network Computer Reference manual for details.
Starting the Audio Mixer with xpsh
xpsh can open the Audio Mixer client, as shown Figure 4-8. To open the Audio Mixer with xpsh, enter the following:
xpsh -display nc_name:0 mixer
Using the Audio Mixer
To use the Audio Mixer to monitor input, adjust the volume levels of the Line In Gain, Digital Gain, and the Microphone Gain, depending on what you are using as the input source(s).
Examples of Using the Audio Mixer
Below are some common examples of using the Audio Mixer.
- You can play a compact disc through the network computer's speaker (Line In) and use the Audio Mixer to control the volume.
- When recording an audio file using the Audio Player, you can open the Audio Mixer client and adjust the Line In Gain volume so that you can monitor the file as it records. (You are not required to use the Audio Mixer when recording an audio file.)
- To selectively record specific segments of an audio source, adjust the Audio Player so that it is ready to record, open the Audio Mixer, and begin playing the audio source. When a segment plays that you want, start recording. When finished, stop the recording while still listening to the audio source. When another segment starts that you want to record, begin recording again. This allows you to selectively record only what you want without having to start and stop the audio source.
- To record multiple inputs, set the input source on the Audio Player to Mixed. The Audio Mixer now controls the recording volume of each of the input sources. For example, to record a presentation with background music and your voice, set the Line In Gain to a lower level than the Microphone Gain. (The Line In Gain controls the music volume, and the Microphone Gain controls the recording volume of your voice through the microphone.) Set the recording settings on the Audio Player, start recording the music and begin speaking into the microphone. When finished, stop the recording and play back the audio file. Re-adjust the levels on the Audio Mixer and re-record until the relative gains are correctly set.
Keep in mind that after the relative gains for the input sources are set with the Audio Mixer, you can then use the Recording Level feature on the Audio Player to adjust the multiple sources as a single source at a higher or lower level.
Saving the Audio Mixer Level Settings
To save the level settings from one Audio Mixer session to another, note the dB values for the Line In Gain, Digital Gain, and Microphone Gain and add them to the start AUDIO_SERVER command in the remote configuration file (xp.cnf). The next time the Audio Mixer starts, the dB values are preset.
Closing the Audio Mixer
To close the Audio Mixer, select the Quit command from the File menu.
Digital Video Player
The Digital Video player allows you to play video files in a video window on your network computer. The video file must be in MPEG file format. When started, the Video Player displays as shown below.
Figure 4-9 Video Player.
The following information about the Video Player is available:
Starting the Video Player
The video player can be started from the Client Launcher, from the remote configuration file, or with xpsh.
Starting the Video Player from the Client Launcher
From the Multimedia submenu, select Digital Video. The Video Player displays as shown in Figure 4-9.
Starting the Video Player from the Remote Configuration File
The start DIGITAL_VIDEO command in the remote configuration file (xp.cnf) can be used to automatically download and start the Video Player when the network computer boots. Refer to the start command in Chapter 2 of the Tektronix NC200/NC400 Network Computer Reference manual for details.
Starting the Video Player with xpsh
xpsh can start the Video Player client, as shown in Figure 4-9. To open the Video Player with xpsh, enter the following:
xpsh -display nc_name:0 vplay
The following vplay options can be set on the xpsh command line:
-h host - specifies the host name or address on which the video file resides. The host must be entered in the network computer's Internet Host Table in Setup. This host displays in the Video Player's File Information area.
-f filename and path - specifies the video file name and its entire path. This file displays in the Video Player's File Information area.
-a access method - specifies the access method used to access the video file. Available access methods are tftp, nfs, dap and multicast. NFS is the preferred file access method for faster and more accurate data transfer rates required by the player. In addition, there is a 16MB limit on files transferred with TFTP.
-v volume level - specifies the volume level to use when playing the video file. Specify a number between 0 and 100, with 0 indicating no volume, and 100 indicating the loudest volume setting.
-m (Mute) - specifies that the video file plays with no sound.
-c (Color) - specifies that the video file displays in color (used only if the video was recorded in color).
-nc (No Color) - specifies that the video file displays in greyscale images.
-b (Big) - specifies that the video file displays in a frame four times the size of the original file.
-p (Play only) - when used with the -h, -f, -a, and -v options, the specified file plays without showing the Video Player. The entire file plays and cannot be interrupted.
-all (Play All; software player only) - plays all frames in a video file. Frame scheduling is ignored and the audio will not be in sync.
-title "string"- assigns a title for the vplay windows.
-propcmd - creates properties that allow other clients to send command strings to the Video Player. These properties can be used to control the Video Player from another client. For details about the properties, see the vplay man page.
-brightness n - sets the brightness level of the video file. Specify a number between -50 and +50.
-contrast n - sets the contrast level of the video file. Specify a number between -50 and +50.
-BUFSIZE n - (hardware player only) specifies the size of the Video Player's memory buffer (in kilobytes). The value defaults to 1024 and can not be set lower than 1kilobyte. If the value specified is greater than available memory when trying to play a file, the Video Player reduces its buffer to the available memory.
-CHKSIZE n - (hardware player only) specifies that the Video Player's memory buffer is divided into "chunks", measured in kilobytes. The network fills the chunks, and the Video Player empties them as they are accessed. The default is 32, which divides the buffer into 32 kilobyte chunks. If the chunk size is set to a number larger than the buffer size, the chunk size will be truncated to one half the buffer size. The chunk size cannot be set less than 1 kilobyte.
-CHKDELAY n - (hardware player only) specifies the time delay (in milliseconds) that the Video Player waits following each read request that fills a chunk.
Examples
This example opens the Video Player on the network computer named sierra:
xpsh -display sierra:0 vplay
This example opens the Video Player with the host portland and the video file
/usr/adam/scene.mpg preloaded in the Video Player's File Information Area:
xpsh -display sierra:0 vplay -h portland -f /usr/adam/scene.mpg -a tftp
This example plays the video file /usr/adam/scene.mpg (located on the host portland) in color and with no sound on the network computer without showing the Video Player:
xpsh -display sierra:0 vplay -h portland -f /usr/adam/scene.mpg -a tftp \
-c -m -p
Opening a Video File
The Open command on the File menu opens and displays an existing video file. Video files must be in MPEG file format only.
- Select the Open command from the File menu. The File Selection window appears.

- To select the access method to use, position the mouse pointer on the NFS button and click. A drop down menu displays the available methods: TFTP, NFS, or DAP. The File Selection window changes to reflect the chosen access method.
Using TFTP Access
The following File Selection window displays when tftp is the access method.
NOTE: Use tftp as the access method only if NFS is not available. NFS provides better and more accurate data transfer rates required to maintain continuous audio and video stream.
If using tftp as the access method, and you attempt to play a file that is greater than 16MB of MPEG data, the Digital Video Player ignores the remaining data after 16MB has been reached.
In addition, inherent limitations in tftp prevent fast forward and fast rewind from being supported.
- Enter the name or address of the host on which the file is located in the Host field.
- Enter the file's path, filename, and extension in the Path field. The file must be an MPEG file.
- Click OK. The host and file names display in the File Information Area.
Using NFS Access
The following File Selection window displays when NFS is the access method.
- Enter the NFS mount point in the Filter field.
- Click on the Apply Filter button. All subdirectories and files are listed in the Directories and Files areas.
- To view files in a different directory, click on the directory name in the Directories area, and then click on the Apply Filter button. The files in that directory are listed in the Files area.
- Select the file you want in the Files area. The full path and filename prefills in the Selection field. The file must be an MPEG file.
- Click OK. The host and file names display in the File Information Area.
Using DAP Access
The following File Selection window displays when DAP is the access method.

- Enter the node name or address in the Node field. This is the node on which the file is located.
- Enter the file's path and directory in the Filter field.
- Click on the Apply Filter button. All subdirectories and files are listed in the Directories and Files areas.
- To view files in a different directory, click on the directory name in the Directories area, and then click on the Apply Filter button. The files in that directory are listed in the Files area.
- Select the file you want in the Files area. The full path and filename prefills in the Selection field. The file must be an MPEG file.
- Click OK. The host and file names display in the File Information Area.
Playing a Video File
After opening the video file using the Open command, use the Control Buttons to play the file:
 Click on the Play button to start playing the specified file. The video player plays MPEG files only.
NOTE: If the file does not play, check the Console for messages. If the file is not an MPEG file format, the console displays the following message: <FileName> is not an mpeg file!
If the video file includes audio, the Audio Player must be set to a sample frequency rate of 8000Hz. Otherwise, the audio will not play.
 To stop playing the file, click on the Stop button.
 To rewind the video file to the beginning of the file, click on the Rewind button.
 To advance one frame at a time, click on the Forward button. This button is not available if using TFTP as the file access method.
 To fast forward through the file, click and hold the Fast Forward button. Release the button when you want to stop. Refer to the Fast Forwarding and Rewinding topic on page 4-35 for more information.
 To fast rewind through the file, click and hold the Fast Rewind button. Release the button when you want to stop. Refer to the Fast Forwarding and Rewinding topic on page page 4-35 for more information.
 To adjust the volume, slide the volume controller to the right to increase the volume, or to the left to decrease the volume. Be sure the Sound button is on, or pushed in. The Sound button acts as a mute toggle; when it is pushed in, you can hear the sound, when it is off, the sound is muted.
While playing the video file, use the following controls to adjust the size and color of the video file.
- Size Plays the video in the size it was recorded (1X), or in a video window four times the size it was recorded (4X).
- Black/White Plays the video in color, or in greyscale. Turn this option on to play the file in black and white, or off to play the file in color.
- Contrast Sets the contrast level. Slide the level indicator to the left to decrease contrast levels, or to the right to increase the contrast levels.
- Brightness Sets brightness level. Slide the level indicator to the left to decrease brightness levels, or to the right to increase the brightness levels.
Fast Forwarding and Rewinding
The Fast Forward and Fast Rewind functions allow you directly access any part of a video file. By using the Video Player's Fast Forward and Fast Rewind buttons or position slider, you can start playback from any location in a file, or replay a portion of a file any number of times, without having to start at the beginning.
NOTE: The Fast Forward, Fast Rewind, and Position Slider are not available if using TFTP as the file access method.
The slider (NFS only) and time-code window let you see how much of a file has already played. The slider represents a time index corresponding to the time code embedded in the MPEG stream. If the stream begins at zero, the time code acts as a simple timer of how long the video is. Whether you use the buttons or slider, the time-code window displays the time code of the current frame location in hours, minutes, and seconds. Both the slider and window are updated dynamically during playback.
To fast forward or fast rewind using the position slider, do the following:
- Using any mouse button, grab and drag the slider to the right to fast forward or to the left to rewind.
- Release the button when you reach the desired location.
To fast forward or rewind using the Video Player's buttons, do the following:
- Using any mouse button, press and hold the fast forward or fast rewind button.
- Release the button when you reach the desired location.
As you drag the slider or press the fast forward or fast rewind button, the video window is updated, displaying intermediate video portions. When you release the slider or button, the video player returns to its previous state. For example, if a video was playing when you repositioned the slider or pressed the button, the video restarts when you release it. If a video was on pause, it remains on pause.
As mentioned, you can use any mouse button to drag the slider. However, if you click on the first mouse button when the mouse is within the position slider track (but not on the slider button), the slider moves a tiny bit to that side of the slider button, no matter where in the track you place it. Essentially, the video is repositioned to the nearest MPEG Group of Pictures (GOP) boundary (generally about 1/2 second). If you press the second mouse button when it's in the slider track, the file is positioned at that location.
Multicast
Multicast is a way to send packets from a single point to multiple receivers. The receivers can determine when and if they receive the Multicasted packets. Multicast video takes advantage of networks that support Multicasting to decrease network bandwidth and provide a means of easily accessing video information.
The Digital Video player allows you to play video files in a video window on your network computer using Multicast. The video file must be in MPEG file format.
NOTE: Multicast is only available on Series 400 network computers.
Channels
Channel changing is an interface that maps "channel" numbers to Multicast addresses. This mapping is made in the remote configuration file (xp.cnf) and remains fixed until the network computer is rebooted.
Selection of a channel causes the client to cease reception on any current channel and attempt to join a transmission in progress on the selected channel. The client begins reading data from the Multicast IP address. When it reads sufficient data to properly set up the window size, the view window resets its size. A default sized window is started before this happens.
Choosing Multicast Channels
- Edit the video_multicast_entry command line in the remote configuration file (xp.cnf) to set your Multicast channel options. (Refer to the video_multicast_entry command in Chapter 2 of the Reference Manual.) These channels display on the Video Player's Multicast menu option. If you omit this step, the Video Player does not display the Multicast menu.
- In the Video Player, click on the Multicast menu to display the available channels.
- Select the channel from the Multicast menu. The Video Player starts as soon as something is received on that channel.
The example below has two parts. The first part sets up the channels "Blues Channel", "Rock Channel", and "News Channel" using the video_multicast_entry command in the xp.cnf file.
video_multicast_entry "224.200.50.10" "3000" "Blues Channel"
video_multicast_entry "224.200.50.11" "3000" "Rock Channel"
video_multicast_entry "224.200.50.11" "3001" "News Channel"
The second part of the example starts a Multicast session and plays the second Multicast channel in the Multicast channel array (in this example, "Rock Channel") set in the remote configuration file (xp.cnf).
xpsh -display twinkle:0 vplay -chan 2
Multicast Options
The following Multicast options can be added to the xpsh command line when starting the Digital Video Player:
NOTE: Where indicated, the following vplay options apply to both broadcast and Multicast, though in different ways. Only information relevant to Multicasting is included below.
-h host - specifies the Multicast IP address. This address must be the same as the address being used by the Multicast server. See your system administrator for valid choices.The address displays in the Video Player's Addr/Port Information Area.
-f filename - specifies the Multicast port number. This port number must be the same as the port number being used by the Multicast server. See your system administrator for valid choices. The port number displays in the Video Player's Addr/Port Information Area.
-chan n - specifies an index into an array of available Multicast channels. (Refer to the Channels topic above and video_multicast_entry in Chapter 2 of the Reference manual.) Do not use with the -h, -f, -a, or -text options.
-text "string" - specifies the channel string displayed by the Video Player. Do not use with the -chan option.
-a access method - specifies the access method used to access the video file. Use Multicast when Multicasting.
Example
This example starts the Video Player and plays the video being Multicast on IP address 224.200.50.1, port 3000. The Video Player displays the text "The Blues Channel".
xpsh -display twinkle:0 vplay -h 224.200.50.1 -f 3000 \
-a MULTICAST -text "The Blues Channel"
The Video Player opens displaying the Multicast menu as shown in the figure below.
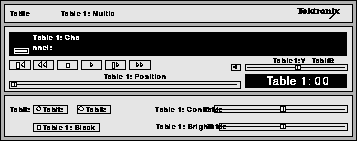
Figure 4-10 Video Player with Multicast Menu.
When viewing a Multicast video, the Forward, Fast Forward, Rewind, and Fast Rewind buttons are not operational. However, the time index (displayed in the Time Code Window) shows the current time code within the current video segment of the Multicast video. You can note the video segment number and load it at a later time as a file, reposition to a specific location, and review a segment of the video previously seen during a Multicast session.
Closing the Video Player
To close the Video Player, select the Quit command from the File menu. Any open file information is saved and the player exits.
Analog Video Player
The Analog Video Player enables you to view NTSC (National Television System Committee) or PAL (Phase Alternation Line-rate) sources in a window on the network computer's display. Common NTSC and PAL video sources are VCR's, video disc players, video cameras, and television tuners. When viewing a video on the network computer, you can control the volume, window size and placement, and color settings. When started the Analog Video Player displays as shown in Figure 4-13.
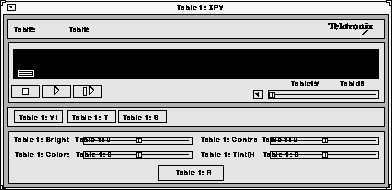
Figure 4-11 Analog Video Player.
The Analog Video player requires the analog hardware. Not all network computer models have the analog hardware.
Before using the Analog Video Player, the xv server extension must be enabled. If the analog hardware is present, the xv server downloads automatically when the network computer boots. If for some reason the xv server extension is disabled, use the enable_xv command in the remote configuration file to enable it. Refer to Chapter 2 Remote Configuration in the TekXPress Reference Manual for details.
The following information about the Analog Video Player is available:
Starting the Analog Video Player
The Analog Video Player can be started from the Client Launcher, from the remote configuration file, or with xpsh.
Starting the Analog Video Player from the Client Launcher
From the Multimedia submenu, select Analog Video. The Analog Video Player displays as shown in Figure 4-13.
Starting the Analog Video Player from the Remote Configuration File
The start ANALOG_VIDEO command in the remote configuration file (xp.cnf) can be used to automatically download and start the Analog Video Player when the network computer boots. Refer to the start command in Chapter 2 of the TekXPress Reference manual for details.
Starting the Analog Video Player with xpsh
xpsh can start the Analog Video Player client, as shown in Figure 4-13. To open the Video Player with xpsh, enter the following:
xpsh -display nc_name:0 xpvideo
The following options can be set on the xpsh command line:
-encode specifies the encoding format. Specify either NTSC, which is commonly used in the United States; or PAL, commonly used in Europe.
-source specifies the video source to which the video device is connected. Specify either COMPOSITE_1, COMPOSITE_2 or SVIDEO1.
-color specifies the color intensity of the video being played. Specify a number from -1000 to 1000. 0 is the default.
-bright specifies the color brightness intensity of the video being played. Specify a number from -1000 to 1000. 0 is the default.
-contrast specifies the color contrast intensity of the video being played. Specify a number from -1000 to 1000. 0 is the default.
-tint specifies the color tint of the video being player. Specify a number from -1000 to 1000. 0 is the default.
Connecting The Network Computer to an Analog Video Device
To use the Analog Video Player, first connect the video device to the network computer. The Analog Video Player plays NTSC and PAL video encoded sources.
NOTE: Refer to your video source user manual for cabling and encoding information.
There are several ports on the back panel of the network computer used for analog video. Connect composite sources to the Port 1 Composite, Port 2 Composite, or Port 1 SVideo ports. Refer to Figure 4-12 for the location of the video ports.
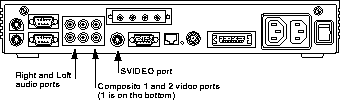
Figure 4-12 Back Panel Showing Audio and Video Ports.
NOTE: You cannot have two video devices connected to Port 1 Composite and Port 1 SVideo at the same time.
Using the Analog Video Player
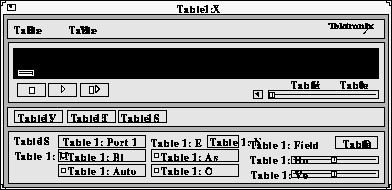
When the audio device is connected, you are ready to view the video on the network computer. When started, the Analog Video Player displays the video options as shown in Figure 4-13. (The Video button on the player is depressed.)
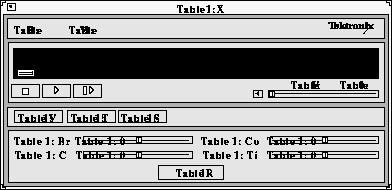
Figure 4-13 Analog Video Player - Video Options.
To play a video on the network computer:
- Connect the video source to the network computer. Refer to the Connecting the Network Computer to a Video Source section.
 Click on the Play button. A separate XPVIDEO window displays which is used to view the video. (This does not affect the video source. You must start the video source with its own play function.) The icon below the File menu changes to include a viewer window. If the viewer window is obstructed by other windows, clicking on this icon brings the viewer window to the top.
 To adjust the volume, slide the volume controller to the right to increase the volume, or to the left to decrease the volume. Be sure the Sound button is on, or pushed in. The Sound button acts as a mute toggle; when it is pushed in, you can hear the sound, when it is off, the sound is muted.
 To freeze a frame, click on the Pause button. This displays the frame in the viewer window, however, has no effect on the video source and it continues to play. Click on the Play button to resume viewing the video source.
 To stop viewing the video, click on the Stop button. This has no effect on the video source and it continues to play.
While viewing a video, you can control the following window attributes:
- Brightness Sets the brightness level. Slide the level indicator to the left to decrease brightness levels, or to the right to increase the brightness levels.
- Color Sets the color level, or intensity. Slide the level indicator to the left to decrease color intensity, or to the right to increase the color intensity.
- Contrast Sets the contrast level. Slide the level indicator to the left to decrease contrast levels, or to the right to increase the contrast levels.
- Tint/Hue Sets the tint, or hue, levels. Slide the level indicator to the left to decrease the tint/hue levels, or to the right to increase the tint/hue levels.
- Restore Restores the video player options to the default settings.
- View Menu The View Menu contains the ResetSize command. This command returns the viewer window to its default size.
Clicking on the Settings button displays the Settings options as shown in
Figure 4-14.
NOTE: The Tuner options are not available at this time.
Figure 4-14 Analog Video Player - Settings Options.
These settings can be changed:
- Source Specifies the video source to use: Port 1 Composite,
Port 2 Composite, or Port 1 SVideo.
- Encoding Specifies the encoding format. Specify either NTSC, which is commonly used in the United States; or PAL, commonly used in Europe.
- Black/White Specifies whether the image in the viewing window displays in color or in black and white.
- Auto Gain Control Specifies the Automatic Gain Control setting. When turned ON, the video signal is automatically amplified for best picture quality.
- Aspect Ratio Specifies the window sizing attributes. Aspect ratio is when the relative proportion of the video window's width and height is preserved when re-sizing the window. When ON, the window size is automatically adjusted to preserve the aspect ratio. If OFF, you can re-size the window to any size and the aspect ratio will not be maintained.
- Overscan Specifies whether the image in the viewer window is in overscan mode. If ON, the full image displays. If OFF, the image is reduced by 10% to match the viewing area of typical consumer television screens.
- Field Duplicate Specifies whether the Analog Video Player uses field duplication. Field duplication is used primarily to eliminate blurred images when viewing fast motion videos or images generated by graphics systems such as video games. AUTO specifies that the player determines whether to use field duplication based on the video window size.
- Horizontal Positions the contents of the view window horizontally. Slide the indicator to the left or right to move the contents of the viewer window left and right.
- Vertical Positions the contents of the view window vertically. Slide the indicator to the left or right to move the contents of the viewer window up and down.
- View Menu The View Menu contains the ResetSize command. This command returns the viewer window to its default size.
Closing the Analog Video Player
To close the Analog Video Player, select the Quit command from the File menu.
The XIE Viewer
The XIE viewer displays an image file using the XIE protocol. The viewer allows you to manipulate a displayed image in the following ways:
When started, the XIE Viewer displays as shown below.
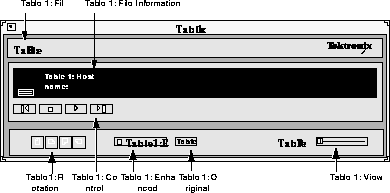
Figure 4-15 XIE Viewer.
The XIE Viewer supports the following formats:
tif - TIFF image file0 pgm - Portable Graymap format
tiff - TIFF image file ppm - Portable Pixmap format
gif - GIF87a format bpcm - bitonal pcm
jpg - MPEG file interchange format bg31 - bitonal G31D compressed
gjpg - MPEG file interchange format bg32 - bitonal G32D compressed
cjpg - MPEG file interchange format bg42 - bitonal G42D compressed
jfif - MPEG file interchange format gpcm - greyscale pcm
bmp - Bitmap format cpcm - color (rgb) pcm
pbm - Portable Bitmap format fax - raw G3 fax with no headers
Starting the XIE Viewer
The XIE Viewer can be started from the Client Launcher, from the remote configuration file, or with xpsh.
NOTE: XIE requires an authorization key. XIE must also be enabled before using the XIE viewer.
Starting the XIE Viewer from the Client Launcher
From the Multimedia submenu, select XIE Viewer. The XIE Viewer displays as shown in Figure 4-15.
Starting the XIE Viewer from the Remote Configuration File
The start XIEVIEW command in the remote configuration file (xp.cnf) can be used to automatically download and start the XIE Viewer when the network computer boots. Refer to the start command in Chapter 2 of the Tektronix NC200/NC400 Network Computer Reference manual for details.
Starting the XIE Viewer with xpsh
xpsh can open the XIE Viewer client, as shown in Figure 4-15. To open the XIE Viewer with xpsh, enter the following:
xpsh -display nc_name:0 xieview
The following options can be set on the xpsh command line:
-ifg color specifies the color used as the foreground on bitonal images. The color specified must be in the network computer's rgb.txt file.
-ibg color specifies the color used as the background on bitonal images. The color specified must be in the network computer's rgb.txt file.
-cc color specifies the background color for the image window. The color specified must be in the network computer's rgb.txt file.
-f filename and path
specifies the XIE file name and its entire path. This file displays when the XIE Viewer is started. The file name and path is displayed in the File Information Area on the XIE Viewer client.
-fullpan True or False
If True, the image uses less memory when zoomed. If False, the image uses more memory when zoomed. When set to False, panning the image is faster. If there is not enough memory to view the entire zoomed image, only part of the image will be available when panning. The default is True.
Opening and Displaying an Image File
The Open command on the File menu opens and displays an existing XIE file in a separate viewing window.
- Select the Open command from the File menu. The File Selection window appears.
- To select the access method to use, position the mouse pointer on the NFS button and click. A drop down menu displays the available methods: TFTP, NFS, or DAP. The File Selection window changes to reflect the chosen access method.
Using TFTP Access
The following File Selection window displays when tftp is the access method.

NOTE: If using tftp as the access method to display an image file, the XIE Viewer cannot display a file that is greater than 16MB. If you attempt to view a file larger than 16MB, the viewer will ignore the file.
Use tftp as the access method only if NFS is not available. NFS provides better and more accurate data transfer rates required to maintain continuous data stream.
- Enter the name or address of the host on which the file is located in the Host field.
- Enter the file's path, filename, and extension in the Path field. Files with the following extensions can be viewed on the XIE Viewer:
gif - GIF87a format ppm - Portable Pixmap format
jpg - JPEG file interchange format bpcm - bitonal pcm
gjpg - JPEG file interchange format bg31 - bitonal G31D compressed
cjpg - JPEG file interchange format bg32 - bitonal G32D compressed
jfif - JPEG file interchange format bg42 - bitonal G42D compressed
bmp - Bitmap format gpcm - greyscale pcm
pbm - Portable Bitmap format cpcm - color (rgb) pcm
pgm - Portable Graymap format fax - raw G3 fax with no headers
NOTE: TIFF and TIF images require random access capability and tftp does not support random access. To view TIFF or TIF files, use NFS as the access method.
- Click OK. The host and file names display in the File Information Area, and the image displays in a separate view window. If the file does not appear, look in the Console for status messages.
Using NFS Access
The following File Selection window displays when NFS is the access method.

- Enter the NFS mount point in the Filter field.
- Click on the Apply Filter button. All subdirectories and files are listed in the Directories and Files areas.
- To view files in a different directory, click on the directory name in the Directories area, and then click on the Apply Filter button. The files in that directory are listed in the Files area.
- Select the file you want in the Files area. The full path and filename prefills in the Selection field. Files with the following extensions can be viewed on the XIE Viewer:
tif - TIFF image file pgm - Portable Graymap format
tiff - TIFF image file ppm - Portable Pixmap format
gif - GIF87a format bpcm - bitonal pcm
jpg - JPEG file interchange format bg31 - bitonal G31D compressed
gjpg - JPEG file interchange format bg32 - bitonal G32D compressed
cjpg - JPEG file interchange format bg42 - bitonal G42D compressed
jfif - JPEG file interchange format gpcm - greyscale pcm
bmp - Bitmap format cpcm - color (rgb) pcm
pbm - Portable Bitmap format fax - raw G3 fax with no headers
- Click OK. The host and file names display in the File Information Area, and the image displays in a separate view window. If the file does not appear, look in the Console for status messages.
Using DAP Access
The following File Selection window displays when DAP is the access method.

- Enter the node name or address in the Node field. This is the node on which the file is located.
- Enter the file's path and directory in the Filter field.
- Click on the Apply Filter button. All subdirectories and files are listed in the Directories and Files areas.
- To view files in a different directory, click on the directory name in the Directories area, and then click on the Apply Filter button. The files in that directory are listed in the Files area.
- Select the file you want in the Files area. The full path and filename prefills in the Selection field. Files with the following extensions can be viewed on the XIE Viewer:
tif - TIFF image file pgm - Portable Graymap format
tiff - TIFF image file ppm - Portable Pixmap format
gif - GIF87a format bpcm - bitonal pcm
jpg - JPEG file interchange format bg31 - bitonal G31D compressed
gjpg - JPEG file interchange format bg32 - bitonal G32D compressed
cjpg - JPEG file interchange format bg42 - bitonal G42D compressed
jfif - JPEG file interchange format gpcm - greyscale pcm
bmp - Bitmap format cpcm - color (rgb) pcm
pbm - Portable Bitmap format fax - raw G3 fax with no headers
- Click OK. The host and file names display in the File Information Area, and the image displays in a separate view window. If the file does not appear, look in the Console for status messages.
Viewing Options
The image from the file is displayed in a separate XIE Viewer window. Use the following XIE Viewer options when viewing an image:
 To display the first page in a multi-image file, click on the First Page button.
 To display the last page in a multi-image file, click on the Last Page button.
 To display the next page in a multi-image file, click on the Next Page button.
 To display the previous page in a multi-image file, click on the Previous Page button.
 To rotate the image, click on the Rotation button, either 90, 180, 270, or 0. Rotation of the image will not resize the XIE Viewer window. When an image is rotated, zoomed images are returned to normal size.
- Enhanced Enables anti-aliasing of the image. This may result in improved readability of the image.
- 100% This button removes the effect of zooming.
- Page Displays other pages in a multi-image file. Move the slider to the right and left to view other pages in the file. The current page number displays in the Page field.
- Zooming To zoom the image, position the mouse pointer at some point in the image, then click and drag over the desired area. A rectangle appears over the image to indicate the selected area. When you release the mouse button, the selected area is scaled up to fit the window. You can zoom an image any number of times. Scroll bars on both the right and bottom of image display window allow you to pan the enlarged image.
Closing the XIE Viewer
To close the XIE Viewer, select the Quit command from the File menu. Any open file information is saved and the player exits.
WinDD
The WinDD client provides access to PC servers running WinDD software. Once you are logged in to the PC server, you can run Windows NT and DOS based applications.
NOTE: DOS graphics applications are not supported (even if started from the DOS Command Prompt in the Main folder). DOS applications can only be run in character (text) mode. Refer to each application for startup options to invoke the application in this mode. If you try to run a DOS graphics application, an error is generated and the application terminates.
Starting Local WinDD
WinDD can be started using the Client Launcher, HostMenu, the remote configuration file or from the command line with xpsh.
Starting WinDD from the Client Launcher
From the Host Connections submenu, select WinDD. The WinDD local client is illustrated in Figure 2-14.
Starting WinDD from HostMenu
Click the WinDD button (if necessary) to access the WinDD list. Click on a server, or enter the server name or address in the Application Server box.
Starting WinDD with xp.cnf
The start WINDD command in the remote configuration file (xp.cnf) automatically downloads and starts WinDD when the network computer boots. Refer to the start command in Chapter 2 of the TekXPress Reference manual for details. Related WinDD remote configuration commands include:
host_connect_method default_host_list
windd_menu_entry windd_auto_connect
windd_auto_reconnect windd_size
default_windd_host windd_host_entry
windd_menubar windd_entrybox
start preload
flash_feature windd_auto_numlock
windd_keysym_only windd_exit_on_logout
Starting WinDD with xpsh
xpsh starts the local WinDD client as needed. Enter the following (where nc_name is the name or address of your network computer):
xpsh -display nc_name:0 windd [options]
The following options can be set on the xpsh command line. If an option is not specified, the default setting is used.
- -display nc:0
Specifies the network computer (nc) name or address to display the WinDD local client.
- -c Auto-connect to the first application server in the application server list. If there are no application servers in the list, this option is ignored and the client window is displayed.
- -nc Do not auto-connect to an application server. (Default)
- -d Displays the menu bar and the internal borders. (Default)
- -nd Does not display the menu bar or the internal borders. For example, this allows a 1280x1024 WinDD window to fully display on a 1280x1024 monitor (minus windows manager decorations).
- -e Enables the Application Server edit field window so that users can add application servers to the application server list. (Default)
- -ne Disables the Application Server edit field window so that users are not allowed to add application servers to the application server list.
- -floppy
Allows supported host versions of WinDD to use its local floppy drive as a network connected drive for the Application Server. Only the first host client to specify this option will be allowed to use the floppy device. NOTE: For host clients (with local floppy drive) only.
- -no_floppy_cache
Disables use of local floppy write cache. This is a fail-safe option to ensure the entire file has been updated in the event a user suddenly ejects a disk mechanically (when disks are ejected via the GUI button, that process flushes the cache so no information is lost).
- -geometry <geometry>
Standard X11 geometry option, <WidthxHeight+X+Y>.
- -h <application server>
Adds the named application server(s) to the application server list. Multiple application servers can be added to the list by listing them separated by spaces.
- -help
Displays a brief help list on the available WinDD command line options.
- -initprog <prog> [-initdir <dir>]
Specifies the application to execute upon application server login. The login session is terminated when the application is terminated.
- Prog specifies the application and can also specify its path (up to 259 characters) and parameters. The program path and name are written consecutively (and not separated by a space) when they are both specified in prog. A space separates the program name and its parameters. These parameters are program specific and can specify program settings or data files to invoke on execution.
Dir specifies the path of the executable program.
- -keysym_only
Specifies that all Tektronix network computer keyboards are supported with keysym translations within WinDD.
- -local_numlock
Specifies that WinDD manages the state of the Num_Lock independent of any Xserver support.
- -no_auto_numlock
Specifies that WinDD does not control the Num_Lock setting.
- -login <username> [pass <passwd>] [-domain <domainname>]
Specifies the application server user account login name, login password, and domain. These values will be used for user account verification.
- When using a WinDD client and connecting to a WinDD application server, your username, password, domain, initial program, and initial directory are encrypted as they are sent across the network.
- Username, password, domainname, dir, and prog are not viewable or changeable from the WinDD configuration window.
- -r Reconnect to the application server after log off.
- -nr Does not reconnect to the application server after log off. (Default)
- -version
Displays the WinDD version in use. (If the license is 8019, this option also prints For evaluation purposes only.)
- -x Exits the WinDD client upon logging out of, or disconnecting from, the application server.
- -nx Does not exit the WinDD client upon logging out of, or disconnecting from, the application server. (Default)
- -force_xcursor
Specifies that monochrome pointers within the WinDD desktop are to be implemented using X cursors. Some monochrome pointers are xor'd with the underlying desktop. When this switch is specified, it is no longer xor'd, as X cursors do not support that mode.
NOTE: The force_xcursor feature is intended to compensate for workstations that do not have a particularly high performance X server. Consider using this option if the pointer flashes when move, or poor performance is observed entering text in dialog boxes. Using this switch improves user interactivity. The only side effect is the pointer is displayed in a single color.
Configuring your WinDD Session from the Client Screen
From the WinDD client screen (Figure 4-16), you can easily change your session attributes before you log in to a server.
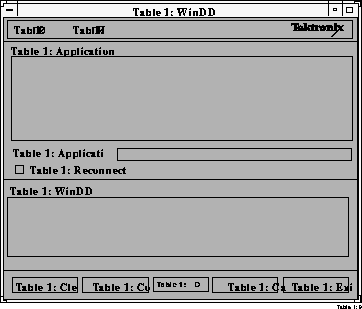
Figure 4-16 WinDD Client Screen.
The Configure button brings up the WinDD Resolution dialog box illustrated in Figure 4-17. The resolution determines the size of the WinDD window. The resolution must be selected prior to making a connection to the application server and cannot be interactively changed until the connection has been closed. The Configure button performs the same function as the Options  Configure pull down menu choice.
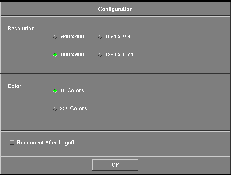
Figure 4-17 WinDD Configuration Dialog Box.
The Reconnect After Logoff button enables automatic reconnection to the application server after you have logged off of a WinDD session. If this button is on, then the WinDD log in screen (Figure 2-16) appears when you select
File Logoff from a Windows NT session. If this button is off, the WinDD client screen is displayed when you log off a session.
WinDD messages about connection status, error conditions, or other necessary user feedback appear in the message console area. All message are also sent to the network computer system console so that the information is available even if WinDD has been terminated. Use the Clear Console button to clear messages.
When configuration is complete, select the application server for your session.
Selecting an Application Server
The WinDD client screen displays a list of application servers your system administration defined for you. Use the mouse to select one of the servers from the list. If the application server you want to access is not on the list, enter the name or address in the Application Server: field and press Enter. WinDD log in information is in Chapter 2, Operating the Network Computer.
WinDD Local Client Options Menu
There are two ways to access the local client Options menu:
- Select Options from the local client menu bar (Figure 4-18).
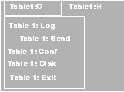
Figure 4-18 Local Client Options Pull Down Menu.
- Hold down Shift and Ctrl and click the middle mouse button (Figure 4-19). This method is only available after you have a server connection.

Figure 4-19 Local Client Options Menu.
Log On
Configure
Exit
WinDD Help Menu
Figure 4-20 Help Pull Down Menu.
About WinDD
PSXpress
After installing the Adobe software, add the following configuration information to the users' environments (typically in their .login or .cshrc files). The contents of this section can also be found in the file user.adobe.
NOTE: Users' execution path, X resources, and PostScript resources must be defined correctly for all of the Adobe software demos to work.
Changing Execution Paths
Add the following directory to the execution paths or PATH variables: /tekxp/bin/<host>, where <host> is sun, solaris, or hp.
For example, assuming that the installation location at your site is /export/tekxp, the following commands change a user's execution path to run Adobe software on a SunOS 4.1.3 system:
# setenv PATH /export/tekxp/bin/sun4:"$PATH"
# rehash
Integrating Icons into an OpenWindows Desktop
To integrate Acrobat Reader icons into an OpenWindows desktop, run the olwm.deskinstall script. You can run this script as root, or from your login account.
If you are root, the binder rules are defined on a system-wide basis in /etc/cetables/cetables. If you run the script as a normal user, the binder rules are installed in $HOME/.cetables/cetables.
Follow these steps for system-wide installation:
- In a UNIX shell window, as root, locate the olwm.deskinstall script:
# cd /tekxp/AcroRead_2.1/desktop
- Run the olwm.deskinstall script:
# ./olwm.deskinstall
After the script has been installed, a message appears, indicating that you have successfully installed the software:
- For the changes to take effect, log off of the OpenWindows window manager, and log back on.
Using Display PostScript NX with Sun AnswerBook
To run AnswerBook on Solaris systems, first verify that:
To run AnswerBook:
- Add the following to the LD_LIBRARY_PATH environment variable:
<install_directory>/tekxp/dpsnx_2.1/common/lib
Add this line before the /usr/openwin/lib entry.
- Set the display variable, where nc_name is the network computer's name:
# setenv DISPLAY nc_name:0
- Run the execnx command:
# execnx &
- Run AnswerBook:
# answerbook
X Resources and Application Defaults
Add the following template to the value of the user's XFILESEARCHPATH variables:
/tekxp/dpsnx_2.1/common/app-defaults/%N.ad
PostScript Resources
Add the following directory to the user's PSRESOURCEPATH environment variables. The PSRESOURCEPATH definitions should end with two colons (::):
/tekxp/dpsnx_2.1/common/psres
For example, if you want to use the applications in the PSXpress option and PSRESOURCEPATH has not been set, use the following command:
# setenv PSRESOURCEPATH /tekxp/dpsnx_2.1/common/psres::
It correctly sets the PSRESOURCEPATH variable.
Launching Applications
By default, Adobe Acrobat Reader and other applications are installed in /tekxp/bin/{sun4|solaris|hp}. Make sure this directory has been added to user's execution search paths.
Table 4-1 lists the commands used to launch Adobe applications.
Launching Acrobat Reader
If you have configured OpenWindows as described in the Integrating Icons into an OpenWindows Desktop section, you will see the Acrobat Reader icon on your desktop. Click on the icon (or on a PDF document icon) to start Acrobat Reader.
To view one or more files while starting Acrobat Reader, give the file names as command line parameters. For example, to view /tekxp/AcroRead_2.1/sun/doc/Tour.pdf and /tekxp/AcroRead_2.1/sun/doc/Samples/Backgrndr.pdf, enter:
# acroread /tekxp/AcroRead_2.1/sun/doc/Tour.pdf \ /tekxp/AcroRead_2.1/sun/doc/Samples/Backgrndr.pdf
The acroread launch script and the acroread_frontend program ensure that only one version of Reader runs on your desktop. If you issue the command acroread filename.pdf when Reader is already running, the currently running version of Reader loads and displays filename.pdf.
If you want a new version of Reader each time you issue the acroread command, /tekxp/AcroRead_2.1/custom/USEFRONTENDPROGRAM or launch acroread as follows:
# acroread -e USEFRONTENDPROGRAM=0
Locating Acrobat Reader Preferences File
The preferences that are specified by the user through the Preferences Dialog are stored in a preferences file. Acrobat Reader reads this file at startup and writes this file every time the user clicks the OK button in the Preferences dialog.
The specific preferences file used by Acrobat Reader is determined by selecting the first non-directory file that can be located from a list of candidates. The candidate list is specified as a colon-separated list of path names. The path names may contain the special sequence %N to denote Acrobat Reader's class name, which is Acroread. For example,
/user/joe/app-defaults/%N:/user/joe/%N
specifies two candidate preferences files, namely /user/joe/app-defaults/Acroread and /user/joe/Acroread.
If this candidate list was used by Acrobat Reader to locate the preferences file, then if /user/joe/app-defaults/Acroread exists as a plain file, it will be used as the preferences file. Otherwise, if /user/joe/Acroread exists as a plain file, then it will be used.
If neither file exists, then the file /user/joe/app-defaults/Acroread, being the first candidate specified, will be created when Acrobat Reader writes the preferences file.
The content of the candidate list depends on two environment variables, XAPPLRESDIR and XUSERFILESEARCHPATH.
- If neither XAPPLRESDIR nor XUSERFILESEARCHPATH is set in the user's environment, then the candidate list is $HOME/%N, where $HOME denotes the user's home directory.
- Otherwise, if XUSERFILESEARCHPATH is set, then the value of XUSERFILESEARCHPATH is used as the candidate list. For example, the user could get the candidate list specified in the example above by entering the following C-shell command:
# setenv XUSERFILESEARCHPATH \ /user/joe/app-defaults/%N:/user/joe/%N
- Otherwise the candidate list will be $XAPPLRESDIR/%N:$HOME/%N, where $XAPPLRESDIR denotes the value of the XAPPLRESDIR environment variable.
If users have a file named Acroread in their home directories, then they need not specify an XAPPLRESDIR or XUSERFILESEARCHPATH environment variable.
The following single entry in a user's .cshrc file will cause applications to look for the appropriate preferences files in the app-defaults subdirectory of the user's home directory:
setenv XUSERFILESEARCHPATH $HOME/app-defaults/%N
The complete set of rules for determining the candidate list can be found in
The X Window System Toolkit, published by Digital Press.
Printing Documents with Acrobat Reader
You can print PDF files from within Acrobat Reader by choosing Print from the File menu. You can also print PDF files using Acrobat Reader from the command line. For example, to print the file sample.pdf to the default printer from the command line, enter:
# acroread -print sample.pdf
To print the file sample.pdf to the printer named laserprinter, enter:
# acroread -print sample.pdf -Plaserprinter
You can pipe a PDF file into acroread for printing using the -print option:
# cat sample.pdf | acroread -print
Converting PDF Files to PostScript Files with Acrobat Reader
You can convert PDF files to PostScript documents from the command line with Acrobat Reader. The following command converts the PDF file sample.pdf to a PostScript file stored as sample.ps:
# acroread -toPostScript sample.pdf
You can convert one or more PDF files and put the PostScript results into a directory. For example, to convert sample.1.pdf and sample.2.pdf (in the current directory) into PostScript files stored in the subdirectory samples_PS_dir, enter the following command:
# acroread -toPostScript sample.1.pdf sample.2.pdf samples_PS_dir
To specify a series of PDF files to be converted and specify an individual name for each converted PostScript file, use the -pairs option:
# acroread -toPostScript -pairs file_1.pdf file_1.ps
Using Display PostScript NX with Other Applications
The applications bundled with XpressWare are capable of automatically launching a Display PostScript NX agent if one is not available. However, some third-party Display PostScript applications, such as Sun AnswerBook, do not have this capability. Users can start an agent manually for use by these third-party applications with the following command:
# execnx &
Users only need to run execnx once per login session; the agent that it starts will be shared by all Display PostScript programs and applications that use the X display. See TekXpress Installation, Appendix A for information about Display PostScript agents.
Users can use the listnx utility to see if there are any agents already servicing their X displays:
# listnx
For details, see the execnx and listnx man pages located in /tekxp/man/catn by default.
Location of Documentation
PostScript language documents are installed in the /tekxp/doc directory by default. The documents themselves come from the directory /tekxp/dpsnx_2.1/common/doc and include:
ShowPSUserGuide.ps ShowPSReferenceCard.ps
Adobe Acrobat Reader PDF documentation is located in /tekxp/AcroRead_2.1/Help and include:
Help.pdf Tour.pdf
The man pages are installed in the /tekxp/man/catn directory.
Sample documents and example applications are located in /tekxp/AcroRead_2.1/Help and include:
AcrBroch.pdf ShowPSUserGuide.pdf
Backgrdr.pdf ShowPSReferenceCard.pdf
FeatBene.pdf AeFables.pdf
SFO.pdf Claim.pdf
FoneAndMap.pdf ncaa1.pdf
Font Caching
The font caching feature stores fonts in memory for later use. This eliminates the need to download a font each time the application using the font is executed. For example, if you open and close your word processor, then open it again, the fonts are still available if your network computer's memory. This is a more efficient use of resources, since fonts are cached once, instead of duplicated for each occurrence or downloaded over a busy network.
You can specify the amount of memory to allocate or you can flush cached fonts at any time. It is recommended that cache be flushed whenever new fonts (with a font path change) are added, to insure that the proper paths are cached. Flushing does not affect the current applications.
To set a Font Cache Limit:
 Select Setup from the Client Launcher.
- Check the amount of memory in your network computer by, dragging on Statistics and releasing on Memory.
- Drag on Configuration Summaries and release on X Environment.
- Set Font Cache Limit to the amount of memory in kilobytes to allow for font caching. Do not exceed the total memory for your network computer.
To empty the Font Cache and free up network computer memory:
 Select Setup from the Client Launcher.
- Drag on Configuration Summaries Menu and release on X Environment.
- Click the Empty Font Cache button.
Printing Color Hardcopies
This section explains how to print a hardcopy by using the MWM pop-up menu item or by entering a command on the command line. Information in this section is specific to MWM. If you are using another window manager, refer to the documentation you received with that window manager for more information about printing a hardcopy.
NOTE: The host computer must have the appropriate software installed before you can use these hardcopy commands. If you cannot print a hardcopy, contact your system administrator.
Printing from MWM
You can use a pop-up menu to make a hardcopy of a window or a hardcopy of the entire screen.
Making a Hardcopy of a Window
- Move the pointer outside of all windows and drag the Custom mouse button to display the pull-down menu.
- Release on Hardcopy to display another pull-down menu.
- Click the Custom mouse button on Window to change the pointer shape into a cross.
- Move the pointer into the window you want to copy.
- Click the Select mouse button. A single beep indicates the window is being copied. A double beep indicates the copying process is complete.
Making a Hardcopy of the Screen
- Move the pointer outside of all windows and drag the custom mouse button to display the pull-down menu.
- Release on Hardcopy to display another pull-down menu.
- Click the custom mouse button on Screen. A single beep indicates the screen is being copied. A double beep indicates the copying process is complete.
Printing from the Command Line
Here is a general procedure for printing a hardcopy of a window:
- Move the pointer into an X window and click the Select mouse button to activate the window.
- Press the PrintScreen key. This key must be defined by your system administrator. Contact your administrator to find out which key to press and which printer your network computer is configured to use.
Flash Control Console
NOTE: The information in this section is written for system and network administrators responsible for installing and administering one or more network computers in a distributed-computing environment.
This section describes the Flash Control Console (FCC), a graphical user interface that allows the flashing of multiple network computers from a single, central terminal. The FCC offers a convenient alternative to flashing by use of configuration commands in the xp.cnf file. For more information about configuring flash memory by use of configuration commands, refer to Configuring Flash Memory on page 2-115 of the Network Computer Reference Manual.
Capabilities controlled by the FCC include:
Before Using the FCC
Starting the FCC
To bring up the Main menu of the Flash Control Console, type:
>xpsh [-display displayname:0] fcc &
where displayname is the name of the display where the FCC will appear. If you do not enter displayname, the $DISPLAY environment variable is used as the default.
NOTE: You can also set displayname by changing the $DISPLAY environment variable.
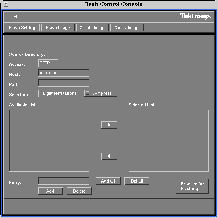
Figure 4-21 The Flash Control Console Main Menu.
The Main menu of the FCC has four areas: The File Menu, the Menu Bar, the Menu Input Area and the Message Box. Let's look at each of those areas in detail.
The File Bar
The File Bar offers the following options on the File pull-down menu:
The Menu Bar
The Menu Bar is where you select the activity you want to perform using FCC.
NOTE: These activities are not activated until after you click the Proceed for Flashing button (discussed shortly).
Flash Settings flashes all the settings you select on the FCC.
Flash Image uses a source image file to flash selected network computers.
Create Image creates an image file using the current settings. If you select this activity, the Image Destination heading appears on the Main menu with the following choices:
Access - TFTP, NFS or DAP (not currently supported).
Host - The host name or address where you want to store the image file.
Path - The name and full path of the image file. TFTP requires a publicly-writable file and NFS must have the file system mounted.
Image Type - The network computer family used for image creation. Choices include: XP10, XP10T, XP330, XP330PEX and XP350.
Query Image queries an image file.
The Menu Input Area
The area of the FCC where you select the options you want to flash is called the Menu Input Area and contains the following:
Access
Specifies which file access method to use. The options are: TFTP, NFS or DAP (not currently supported).
Host
The field you use to specify the host name or address where files to be flashed are read. For example: 128.123.186.67.
NOTE: The host name must be specified in the Internet Host Table of TekSetup.
Path
The text field you use to specify the source directory of the files you want to flash. For example, /vol/Boot.
Selection
Specifies the parameters available for flashing. The options are: Target network computers, Tek Features, User Files or User Fonts.
Compress
Selecting this option causes the files to be flashed in compressed format. It is recommended that you use Compress to save space; however, compression will affect system performance.
NOTE: This button does not appear if you select Flash Image or Query Image.
Available List
Lists the items that are currently available for flashing.
Selected List
Lists the items that have been selected for flashing.
NOTE: To move an individual item between the Available List and the Selected List, highlight the item you want to move and then click the appropriate "arrow" located between the lists.
Entry
A text field where you enter a parameter that can then be added to the Available List for flashing. This can include:
Add
Adds information to the Available List that currently appears in the Entry field.
NOTE: Items appearing in the Selected List also appear in the Available List enclosed in brackets.
Delete
Deletes highlighted names and addresses from the Available List.
NOTE: When you use this feature, the brackets around the items in the Available List (see "Add," above) disappear.
Add all
Copies all the items from the Available List to the Selected List.
Del all
Deletes all the items in the Selected List.
Proceed for Flashing
Takes you to the Flash screen (discussed shortly).
The Message Box
The area at the bottom of the screen where a brief message displays whenever the cursor passes over a field on an FCC menu.
The Flash Screen
After selecting the features you want to flash and clicking the Proceed for Flashing button on the Main menu, the Flash screen appears (Figure 2).
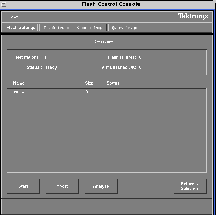
Figure 4-22 The Flash Screen
The central part of the Flash screen is called the Overview. It is here that a list of the individual features you want flashed are listed, as well as current information about the status of any analysis being performed.
There are four buttons at the bottom of this menu:
After Doing an Analysis
Once you have completed an analysis, the Status line in the Overview area shows Analysis Complete. Double-clicking on a network computer name at this point brings up the Network Computer Status box, which displays the network computer name, status of the analysis, flash memory available, and total memory size required by the network computer. You can view the statistics for any groups listed by doubled-clicking on their name to bring up the Group Status box. Click on the Return to Netstation button and then the Return to Overview button to go back to the Flash Screen.
[Prev Chapter] [Next Chapter] [Index]